To configure the PLBPOS Interface, complete the steps outlined in the below order.
Click on each of the step headings below for information relating to completing that step.
Note!
The PLBPOS Interface is currently available for Tyro and PC-EFTPOS AU Integrations.
You will need to ensure that PLBPOS has been enabled in the Licence Gateway before it can be used.
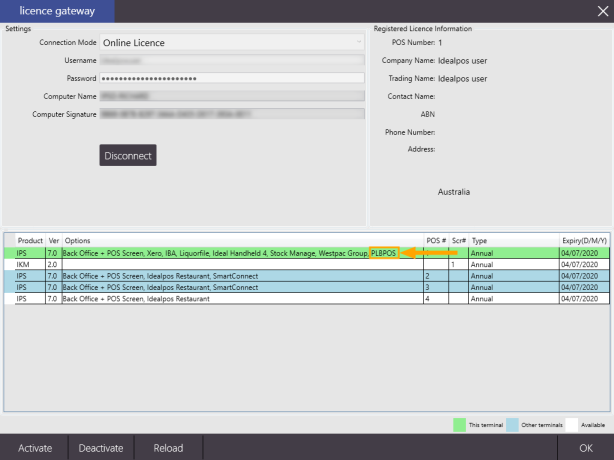
Go to: Setup > Licence Gateway.
Any modules licensed for the current terminal will be displayed in the green area.
If you have been licensed for PLBPOS, PLBPOS will appear under the Options column.
If PLBPOS does not appear in the Licence Gateway, please contact us and speak to Sales who will be able to organise your Licence for PLBPOS.
Once the PLBPOS module has been added to your licence, you will need to open the Licence Gateway window and press the "Reload" button on the bottom left-corner of the Licence Gateway window.
This will obtain/download the latest licence details from Idealpos. Once this has been done, PLBPOS should appear as per the below image.
Press OK, then completely restart Idealpos for the licence to take effect.
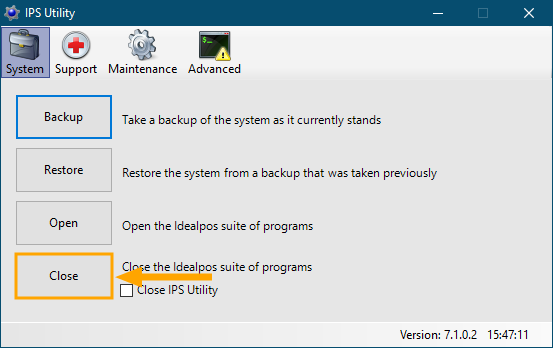
Idealpos can be closed via the IPS Utils (Start > Idealpos > IPSUtils) > press the "Close" button which will close the Idealpos suite.
Idealpos can then be started via the Desktop shortcut or via the Start Menu (Start > Idealpos > Idealpos).
In order to restrict items from being purchased using CDC Cards, you will need to create a Stock Item Attribute Type/Attribute.
Go to: File > Sales > Stock Item Attributes
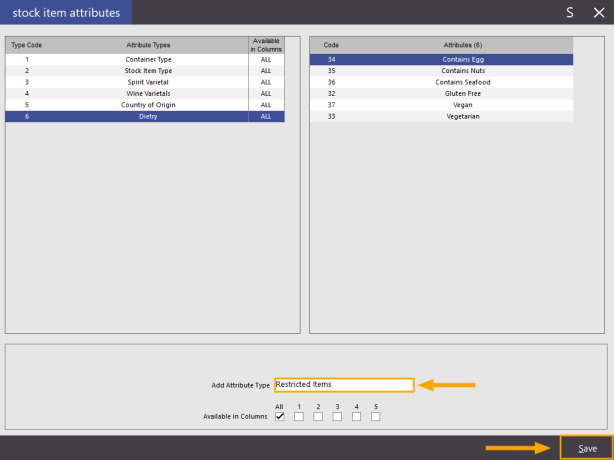
Press the "New Attribute Type" button on the bottom-left corner of the window, then enter "Restricted Items" as per the below example.
Once finished, press the "Save" button on the bottom-right corner of the window.
Press the "X" button on the top-right corner of the window to close the "Add Attribute Type" window.
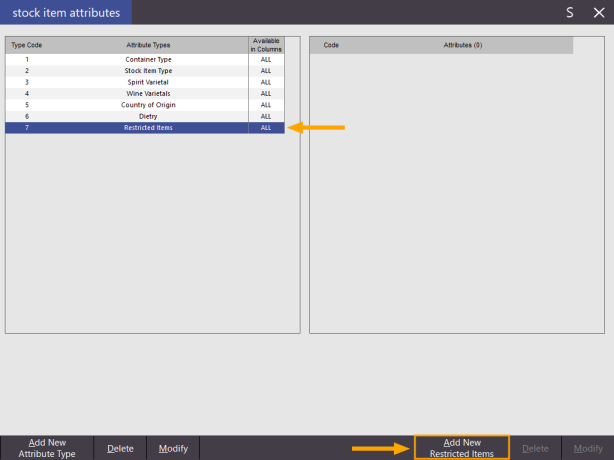
Select the Attribute Type "Restricted Items" from the left-hand side list, then press the "Add New Restricted Items" button on the bottom-right corner of the window.
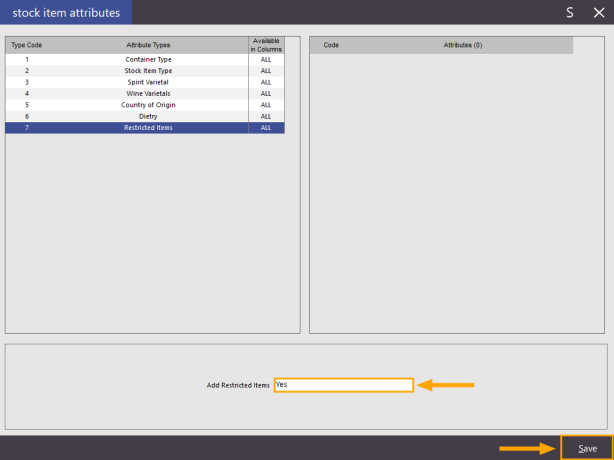
Enter "Yes" into the "Add Restricted Items" field, then press "Save" on the bottom-right corner of the window.
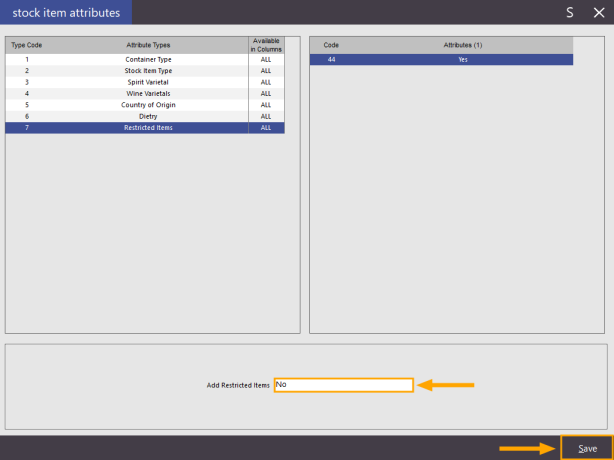
Optional Step - Enter "No" into the "Add Restricted Items" field, then press "Save" on the bottom-right corner of the window.
By adding the "No" Attribute and assigning items to it (further below), you will have the ability to filter the Stock Items screen based on whether or not Stock Items have restriction enabled.
After saving the Attributes, close the Add Attribute window by pressing the "X" button on the top-right corner of the window. Press the "X" button again to close the Stock Item Attributes window.
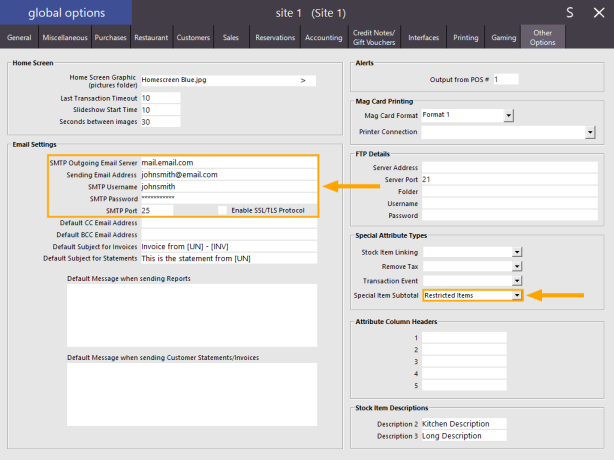
We need to select the new Restricted Item Attribute Type from the Special Item Subtotal dropdown box.
To do this, go to:
Setup > Global Options > Other Options
From the Special Item Subtotal dropdown box, select "Restricted Items".
Note that Email Settings must also be configured in order for the PLBPOS Integration to work.
Enter the required details into the following Email Setting fields:
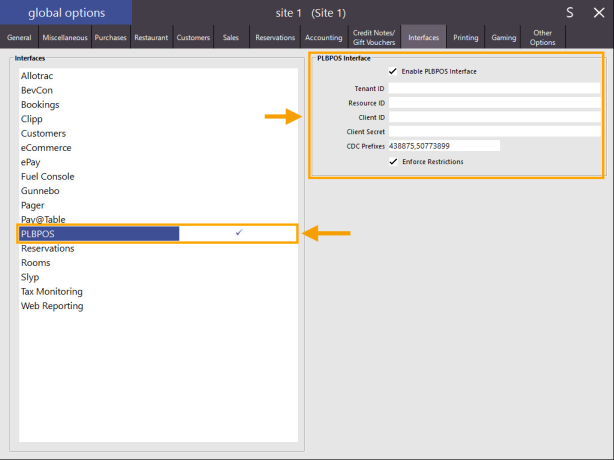
We need to enable the PLBPOS Interface in Global Options.
Go to: Setup > Global Options > Interfaces > PLBPOS
Configure the options as follows:
Note!
In Idealpos v7.1 Build 28 and newer, the Tenant ID, Resource ID, Client ID and Client Secret fields are available.
These must be configured using the details supplied by the Government Body/Institution after upgrading from an older build of Idealpos v7.1/v7 to Build 28 or newer.
When configuring the PLBPOS Interface on a new site with the latest build of Idealpos, ensure that these fields are configured accordingly.
Enable PLBPOS Interface - Enabled
Tenant ID - Enter the Tenant ID supplied by the Government Body/Institution.
Resource ID - Enter the Resource ID supplied by the Government Body/Institution.
Client ID - Enter the Client ID supplied by the Government Body/Institution.
Client Secret - Enter the Client Secret supplied by the Government Body/Institution.
CDC Prefixes - These are the Card Prefixes that will be subject to the Item Restrictions. By default, 438875 has been entered (this is the initial prefix that was supported when this integration was first implemented). We recommend adding an additional Card Prefix of 50773899. So, the CDC Prefixes should appear as 438875,50773899.
We also recommend checking with the governing body to ensure that you have included all CDC Card Prefixes that should be subject to the PLBPOS function.
Enforce Restrictions - Enabled
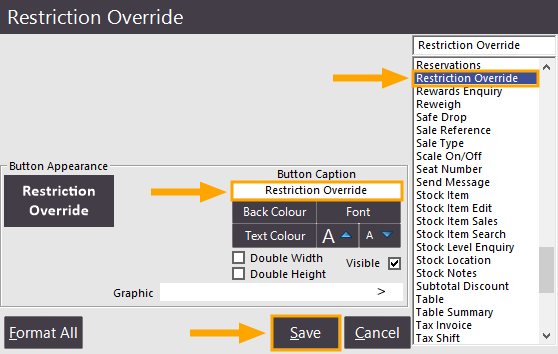
We need to create a button on the POS Screen which will be used in the event that the Clerk needs to override Restricted Items (e.g. when a clerk serves an intimidating or threatening customer).
Go to Setup > POS Screen > POS Screen Setup > Select POS Screen Layout > Press "Buttons"
Select a POS Screen tab where you want to create the Restriction Override button, then select a blank/unused button.
Configure the button by selecting the "Restriction Override" function from the list.
If required, the button caption and colour can also be configured/adjusted.
Once the button has been created, close the POS Screen Layout windows.
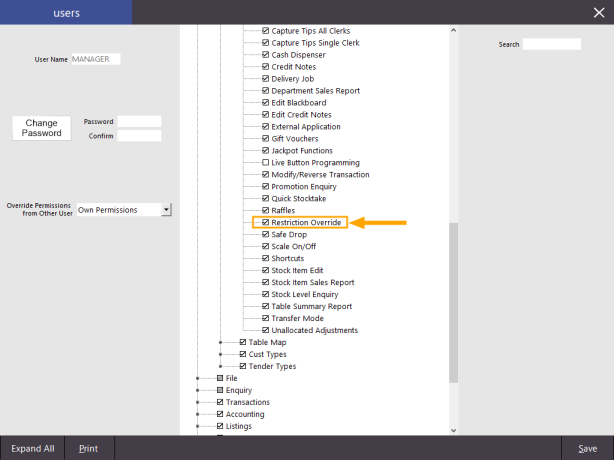
You will need to configure which Users/Clerks have access to the Restriction Override function.
This is done via User Permissions/Clerk Permissions.
Note!
Important details regarding this step: All Clerks are linked to a User via the User Permissions Link option.
The permission for "Restriction Override" must be enabled at the User level.
The only exception to this is if the Clerk is linked to the Admin User, the permission can be enabled at the Clerk level.
You cannot grant a Clerk access to a function via the Clerk Permissions if access to the function at the User Permission level has been disabled.
If you have specific Clerks that you want to deny access to this function, you can modify the Clerk Permission and disable access to the Restriction Override function.
If enabling the Restiction Override function for a User, any Clerk that is linked to that User will have access to the function.
From there, you can disable access to this function for individual Clerks via Clerk Permissions.
To configure User Permissions, go to: Setup > Users > Select the User > Modify.
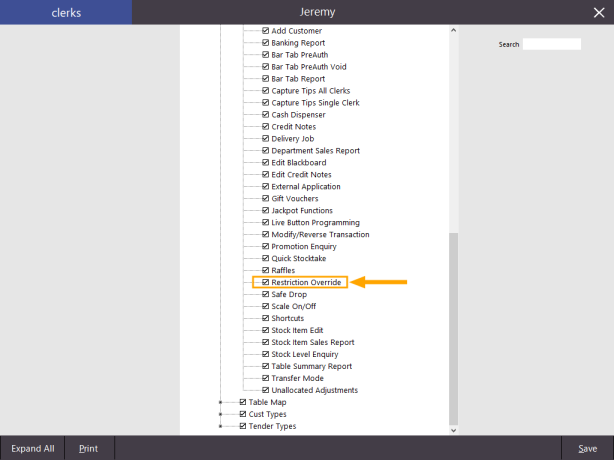
Within the Permissions window tree view, go to: Clerk Permissions > POS > Restriction Override > Disable/Enable
To configure Clerk Permissions, go to: Setup > Clerks > Select Clerk > Permissions.
Within the Permissions window tree view, go to: Clerk Permissions > POS > Restriction Override > Disable/Enable
In order for the above changes to take effect, Idealpos must be restarted.
This can be done by going to Start > Idealpos > IPSUtils > Press the "Close" button and confirm the prompt.
After Idealpos has closed, you can start it again either via the Idealpos Desktop Shortcut or by going to Start > Idealpos > Idealpos
Now that the PLBPOS Interface has been enabled, the final step is to assign items to Attribute Type/Attribute.
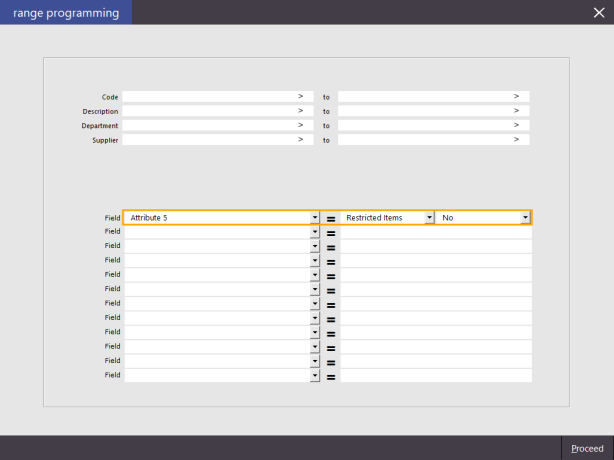
If you created a "No" Attribute for the "Restricted Items" Attribute Type, we recommend using Range Programming to set all your items as Restricted - No.
If you haven't created a No Attribute, you can skip this step.
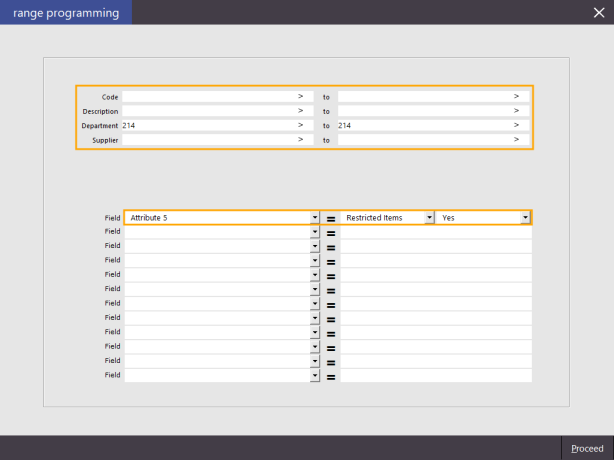
Range Programming can be completed by going to Utilities > Range Programming > Stock Items.
When using Range Programming to set Attributes, ensure that you find an unused Attribute Slot that is consistent across all your Stock Items.
It is important that the Attribute Slot is unused across all Stock Items, otherwise, any existing selections that exist in the Attribute Slot will be overwritten during the Range Programming process.
To update all items in your system, leave the selection criteria as blank, then select an Attribute Slot which is unused across all Stock Items in your system.
If any Stock Items in your system are currently using the selected Attribute Slot, it will be overwritten with the chosen value in the Range Programming window.
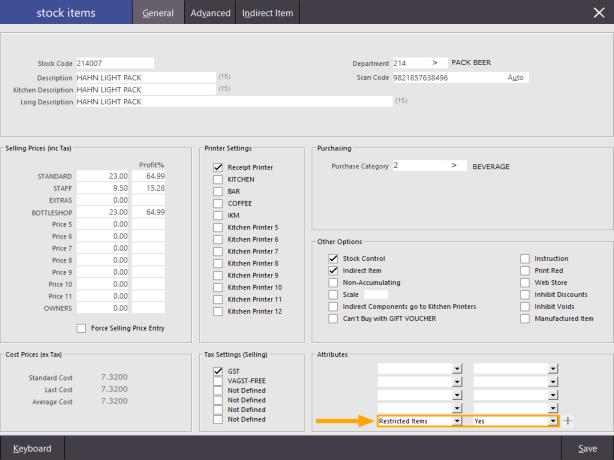
Once all unrestricted items have been assigned to Restricted Items-No, you can then modify the items which are Restricted by updating the Attribute Slot from Restricted Items-No to Restricted Items-Yes.
Depending on the number of Stock Items you need to update, the following options can be used:
In order to filter the Stock Items screen based on the Restricted Items Attribute Type, you will need to configure an Attribute Column Header in Global Options.
The field for the Attribute Type then needs to be enabled in the Stock Items screen.
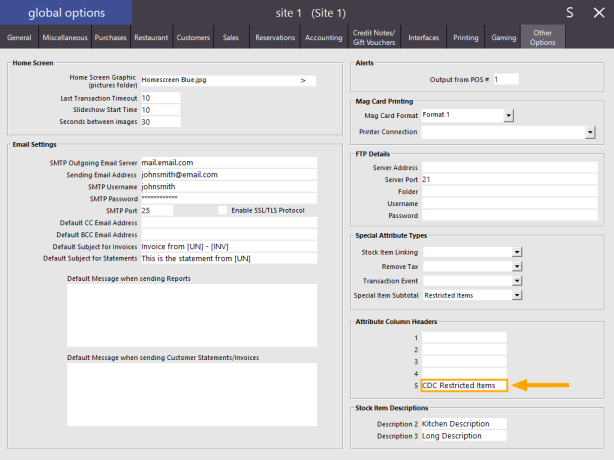
Go to: Setup > Global Options > Other Options > Attribute Column Headers
Each of the Column Headers displayed correspond to an Attribute Slot. Ensure that you set the Column Header number that corresponds to the Attribute Slot number you have used to assign your Restricted Stock Items against.
Select the Attribute Slot, then enter a description for the slot.
You can enter any description you like. The entered description will be displayed at the top of the Stock Items screen above the field that will be used for filtering Restricted Items.
The below example shows a Description/Label entered for Attribute Slot 5, however, your system may vary depending on the Attribute Slot used above:
Close the Global Options window.
Now that the Attribute Slot has been labelled, you will need to enable it on the Stock Items screen.
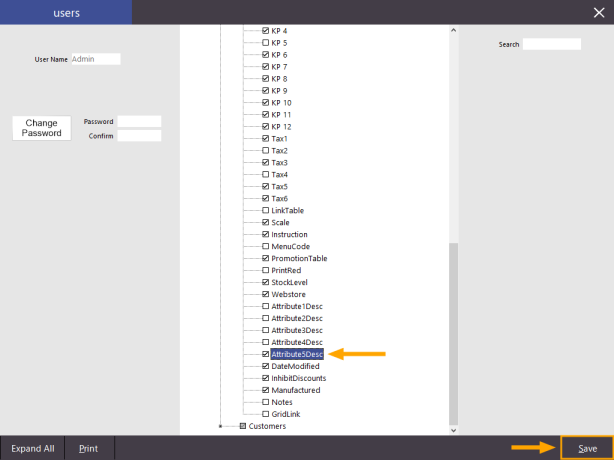
Go to: Setup > Users > Select "Admin" > Modify.
From the tree view, expand File Fields > Stock Items > Enable Checkbox "Attribute#Desc" (Substitute # with the number of the Attribute Slot you've used).
Press "Save" to save the change.
By default, this field in the Stock Items window will appear off the edge of the Stock Items screen (you will need to scroll to the far-right of the Stock Items window to see this field), so you may want to move it across to the left side to allow fast access to this field.
Go to: File > Stock Control > Stock Items
At the top-left corner of the Stock Items window, select the cog icon as illustrated below:
After selecting the cog icon, the Stock Items screen will change to an edit mode which can be used to modify the appearance of the screen.
Scroll to the far-right of the Stock Items screen until you find the CDC Restricted Items column. Typically, this will be one of the last columns in the header.
Once the column has been found, select it by clicking on it once, then click on it again and keep holding down on the mouse button while dragging it to your preferred location:
While dragging, two small arrows will appear which will indicate the new position of the column header.
Keep dragging the header until you find a suitable position for it.
Release the mouse button to drop the column header into the new position.
Close the Stock Items window to save the change.
Once the above steps have been completed, the PLBPOS Interface is ready for use.
For information about using the PLBPOS Interface, click here